In collaboration with UPS, CoreCommerce has developed three (3) new tools giving your customers more flexibility when shipping and returning products via UPS. The services are in addition to the real-time rate quotes, label printing and shipment tracking tools already available to you.
The UPS terms for these new services are:
- UPS Access Point
- UPS Store Locator
- Mail Innovations
UPS Access Point Locations offers a way for customers to select alternative shipping destinations. UPS Access Point locations are convenient places, such as The UPS Store, local grocery stores, gas\petrol stations, and other local businesses that offer easy package drop-off and pickup.
UPS Access Point locations can be staffed retail locations or unstaffed locker locations. With evening and weekend hours, UPS Access Point locations fit consumers' schedules. This service is offered in over 50 origin countries and 19 destination countries that UPS serves.
This is a fast, convenient way for your customers to find alternative “ship to” locations close to their work or home, complete with a map and the store hours. Customers are not always home and this convenience enhances their confidence that your product will be received.

The Access Point, when selected, will be saved as the Shipping Address for this specific order.

When they click this button, Corecommerce will show the customer a form with their shipping address auto populated and CoreCommerce will search and return a list of UPS Stores near that location. The customer can control the distance using the “Search Radius” select at the bottom of the form. By default it will use “5 Miles”. A search will show a list of results for the UPS stores/locations nearest to the supplied address.
UPS Mail Innovations has been added, which is a joint venture between UPS and the USPS where packages are picked up by UPS and ultimately delivered to the customer by the USPS. It is typically for high volume mailers with packages below 1 pound and is available for domestic and international delivery.
Enabling the New UPS Features
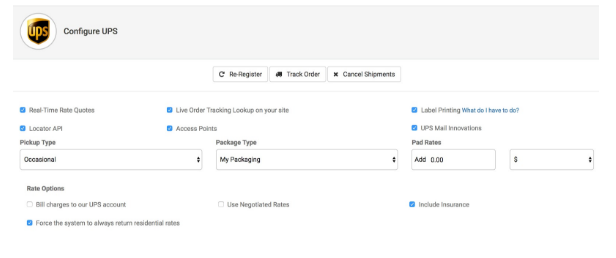
To enable Access Points, Locator and Mail Innovations in your CoreCommerce Admin, login to your admin and navigate to Settings > Shipping Settings > Configure Real Time Carriers. Or, if using the design wizard, configure shipping. Once there, you will see a checkbox for each optional feature under the UPS section.
All the functionality we developed with all locations supported by UPS globally. These new features are in addition to the existing functionality, including:
Real-time rate quotes
Label printing directly from the CoreCommerce store admin, you can easily reference the knowledge base on UPS setup.
Tracking of a shipment - Customers of merchants can see tracking information in their “my account section” of the merchant’s web site and in the email “order shipped” notification.
The first step in configuring UPS for your online store is to open a UPS Web tools account. To open an account, go to https://www.ups.com/myups/info/openacct or call 1-800-PICK-UPS.
Once you have opened an account, the next step is to configure the CoreCommerce admin panel:
- Go to Settings
 → Shipping Settings → Configure Real-Time Carriers
 - Do you use real-time shipping rates, order tracking, or label printing? → YES
- Select UPS from menu → SAVE and CONTINUE
- Make sure that Real Time Rate Quotes is selected.
- Register or Re-Register your UPS account.
- When done, click SAVE and CONTINUE
- After you are done with this, you will need to configure your shipping group(s).
- Once the Shipping Groups are set up you will configure which UPS methods you would like each zone to use.
- Make any other changes needed and then click Save.
Print UPS Labels
To request an Access Key (UPS)
- Go to ups.com and log in with your UPS User ID and UPS password.
- If you do not have a UPS.com User ID and password, click on the New User link at the top of the page and follow the prompts to complete the registration process.
- If you have already registered for My UPS.com, we recommend you create a new user ID and password for use with UPS Developer APIs.
- Hover over the Support tab near the top of the page and then click on Technology Support.
- Click on the UPS Developer Kit link, located in the Tools and Resources section.
- Click on the Request an access key link, this located in the How to Get Started section.
- Complete the Secondary Contact Information section.
- Select the account number you wish to associate with the Access Key.
- If you do not have a UPS account number click the Open a UPS Account link.
- If you already have a UPS account number but it is not listed, click the Add a UPS Account link.
- Click the Request Access Key button.
- The access key and the access type for each Developer API will be displayed. This information will also be emailed to you.
Setting up Label Printing in your CoreCommerce Admin
- Go to Settings→ Shipping Settings → Configure Real-Time Carriers
- Turn on Do you use real-time shipping rates, order tracking, or label printing? → YES
- Make sure UPS has a checkmark
- Click Save and Continue
- Register or Re-register and be sure to select Yes when it asks if you are planning on using label printing or negotiated rates.
- Input your Access Key and ups.com login information in the new fields that appear.
- When done, click the Next button, and you can then continue to configure UPS any further if need be.
- At this point, you should be ready to print labels.
